Posted by Stigern | Posted on 20-01-2011
Category : Minecraft
Tags: bukkit, guide, host, how, howto, minecraft, own, server, tutorial
Why not?
First off we need to download the server software, you can find it here. Look further down on the page and you’ll see a link to a Minecraft_server.exe, thats the one you need. Download it and put it in a folder, lets call it Minecraft_Server.
Now lets run the .exe file you just downloaded so that it creates the config files, and close it when it’s done generating the spawn point. Now your folder should look something like this.
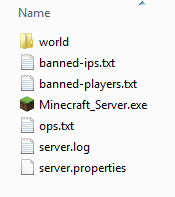
world = the server map, it’s just been autogenerated.
banned-ips.txt = the list of banned IP adresses.
banned-players.exe = banned users.
ops.txt = server operators, users that can kick and ban etc.
server.log = the logfile.
server.properties = server settings, this one is important.
Before we go and configures the server properties, we need to open a port on your router or whatever your behind. Find the routers IP adress, easiest way is to enter cmd.exe and write “ipconfig”. Then look at whats the default gateway. Mine is 192.168.1.1.
So just write the ip adress in your browser(Firefox, Chrome etc) and log on to the router. In this tutorial I’m using a Dlink DIR-655, but it’s done almost the same on most of the routers out there. Click into Advanced, and find Virtual Server. Check the check-box and write the name of the port, just whatever you want to call it. Fill in your computers IP, it can be found the same way we found the routers address, just look for IPv4 Address. Set public and private port to 25565, which is the default minecraft-server port, protocol select both. It should look something like this:

Now just run the server .exe and it should be up and running! When thats done, you can check with this page that the port you opened is open. Of course there are many mods and server managers that are way better than the default one, but at least you get the idea of how you host your own server.
Any questions, or something I forgot? Post a comment!